
Topic 04: The Arduino Uno R3 Microcontroller
Arduino is an Italian company founded by electrical engineer Massimo Banzi. Arduino makes several different kinds of electronics prototyping boards. These boards are generally referred to as microcontrollers. The microcontroller boards are simple-to-use, but powerful, open source printed circuit boards with header sockets to which electronic components can be easily attached. The 'Arduino Uno R3' is Revision 3 (R3) of the Arduino Uno board. The Uno board is one of several different boards made by Arduino. The different boards have different capabilities. The Uno is an excellent all-round, starter board. It is capable of controlling many different kinds of electrical components, including DC motors, servo-motors, light emitting diodes (LEDs), buzzers and many different kinds of electronic components that can sense things like temperature, pressure, light, etc. These boards provide a readily accessible electronics prototyping platform that serves as the microcontroller (the brain) for many different kinds of projects. So, Arduino has taken the more complex process of microcontroller chips and electronic circuit design and integrated it in an inexpensive, easy to program, user-friendly microcontroller package.
Arduino microcontroller boards can be plugged into a computer USB port to provide power to the board and to allow code to be uploaded from the computer to the board. Once code is uploaded to the board and if the board is powered-up, the code will start running to control the Arduino microcontroller. The Arduino boards can also be powered via a 9v battery or a 9v power supply without being attached to a computer via a USB port. In this way, the code can run with the Arduino 'untethered' from (i.e., not attached to) the computer.
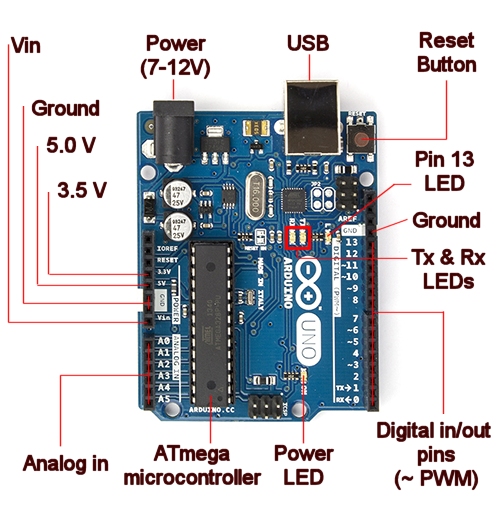
The Arduino Uno has 14 digital input/output (I/O) pins, numbered from 0 to 13. These can be seen along the upper edge of the Arduino Uno in the image above. Each of these has a header pin attached with a female receptacle for attaching the male pin of a breadboard jumper wire. Jumper wires are wires that can be inserted into the receptacles for connecting electronic components to the Arduino board to create a circuit. Six of these 14 digital I/O pins have Pulse Width Modulation (PWM) capabilities. PWM is a digital signal waveform that provides high frequency pulses of specific short pulse durations where the duration of the pulses can be increased or decreased and the pulse duration controls a specific aspect of an electrical component. The digital I/O pins with PWM capabilities are designated with a '~' symbol. In addition to the 14 digital I/O pins, the Arduino Uno also has 6 Analog Input pins. These can be seen along the lower edge of the Arduino Uno in the image above, numbered A0 - A5.
In addition, the Arduino Uno has three ground pins labeled GND, a 3.5V power pin and a 5V power pin. These two power pins provide voltage outputs at the designated voltages for providing power to circuits. The Arduino Uno also has a Vin pin. This Vin pin carries the same voltage as the input voltage to the Arduino. The Arduino Uno can be powered via the DC barrel jack (lower left in the image above) or via a USB port (upper left in the image above). The source voltage to power the Arduino Uno can be between 7V and 12V. The Vin pin voltage carries that same voltage as the source input voltage. Some electronic components can be damaged if they receive power above their power ratings. The Vin pin should not be used for providing power to electronic components below the source voltage that powers the Arduino Uno.
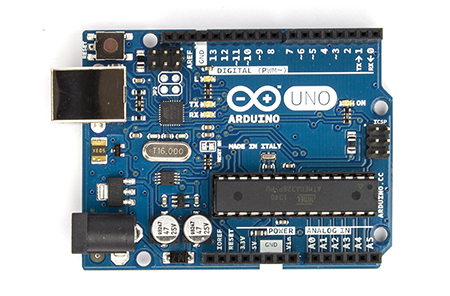
Anatomy of the Arduino Uno R3
More Techincal Details
The Arduino Uno R3 has these techincal characteristics:
| Microcontroller | ATmega328P |
| Input Voltage (recommended) | 7-12V Input |
| Digital resolution | 8 bit |
| Digital I/O Pins | 14 (of which 6 provide PWM output) |
| PWM Digital I/O Pins | 6 |
| Analog Input Pins | 6 |
| DC Current per I/O Pin | 20 mA |
| DC Current for 3.3V Pin | 50 mA |
| Flash Memory | 32 KB (ATmega328P) of which 0.5 KB used by bootloader |
| SRAM | 2 KB (ATmega328P) |
| EEPROM | 1 KB (ATmega328P) |
| Clock Speed | 16 MHz |
| Length | 68.6 mm |
| Width | 53.4 mm |
Using the Arduino boards require building an electronic circuit, writing code for the Arduino and uploading the code to the Arduino. Arduino programming and building circuits will be the subjects of Topic 05 and Topic 06.
The Arduino web site contains all the resources needed to get started with Arduino boards, including:
- an introduction to Arduino
- getting started with Arduino
- how to start coding for Arduino
- the programming reference for Arduino
Go to Topic 05